
Introduction
As mobile threats continue to evolve, securing devices in enterprise environments has become more critical than ever. Many organizations rely on Microsoft Defender for Endpoint to protect their Windows devices, but often overlook the importance of extending that same level of security to mobile devices especially in industrial fields where there are tablets deployed for the frontline workers. I have supported many internal IT teams deploying Android devices and securing them with defender for endpoint.
By the end of this guide, you’ll have a clear understanding of how to secure Android devices using Defender for Endpoint, ensuring your organization is protected against modern mobile threats. Let’s dive in! 🚀
🎯 Goals
By the end of this post, you should unterstand how to leverage the best of both worlds for Android devices: Intune & Defender
- Understand the configuration of Intune for Android devices
- Understand the configuration of Defender for Endpoint for Android devices
- Understand how Intune and Defender work together to provide a seamless security experience for Android Devices
🧩 Use Case
A mid-sized business firm allows employees to use company-issued Android smartphones and tablets for work-related tasks, such as accessing corporate email, internal applications, and Microsoft 365 services.
Example Use Case:
- Industry: Industrial, Manufacturing, Logistics, Healthcare
- Challenge: Frontline workers use Android tablets and smartphones to access corporate resources, but these devices are exposed to phishing attacks, malware, and unsafe networks due to frequent field usage. IT needs to ensure that only secured, compliant devices can access business-critical applications.
- Goal: Deploy Microsoft Defender for Endpoint via Intune to the Android
⚙️ Technical Description
To ensure a secure and manageable Android environment, the implementation is divided into two key steps:
1️⃣ First, we configure Microsoft Intune for device management, enrollment, and policy enforcement.
2️⃣ Then, we configure Microsoft Defender for Endpoint to provide advanced threat protection, compliance enforcement, and real-time monitoring.
This structured approach ensures that all devices are properly enrolled and managed before applying security policies and enabling Defender’s advanced protection.
🔧 Step 1: Configuring Intune
Before you even think about deploying this solution, it's crucial to understand the differences between the enrollment types with Android devices. Choosing the correct enrollment method ensures proper management, security, and user experience within your organization.
Microsoft Intune offers several ways to enroll Android devices, depending on your organization's needs, security policies, and device ownership model. Below is my recommended enrollment option and types:
Android Enterprise
Android Enterprise provides modern management capabilities with enhanced security and flexibility. It includes the following deployment methods:
- Work Profile (BYOD – Bring Your Own Device)
- Best for personally owned devices used for work.
- Creates a separate work profile that isolates corporate data from personal data.
- IT admins can manage only the work profile while leaving personal data untouched.
- Fully Managed (Corporate-Owned Devices)
- Ideal for devices fully controlled by the organization.
- IT has full control over the device, including app installations, security policies, and restrictions.
- Requires device factory reset before enrollment.
- Dedicated Device (Kiosk Mode / Shared Use)
- Best for single-purpose devices like kiosks, digital signage, or shared devices.
- Locks the device into specific apps or functions.
- IT manages all settings and restrictions to limit user access.
- Corporate-Owned, Personally Enabled (COPE)
- A hybrid approach where devices are corporate-owned but allow personal use.
- IT has full management capabilities over the entire device while allowing personal usage.
- Users get a work profile similar to BYOD, but IT still has control over the whole device.
Choosing the Right Enrollment Type
Selecting the right enrollment type depends on several factors:
- Device ownership: Corporate vs. personal.
- Security requirements: Full control vs. limited control.
- Use case: Employee device, shared device, or dedicated kiosk.
| Enrollment Type | Ownership | Control Level | Use Case |
|---|---|---|---|
| Work Profile (BYOD) | Personal | Work profile only | Employees using personal devices |
| Fully Managed | Corporate | Full control | Company-owned employee devices |
| Dedicated Device | Corporate | Locked to specific apps | Kiosks, digital signage |
| COPE | Corporate | Full control with work profile | Mixed personal and business use |
| Device Administrator | Either | Limited (Deprecated) | Legacy systems only |
Create enrollment profile and token
Creating the enrollment profile and generating the token is pretty straight forward. For that head to the following and create the token:
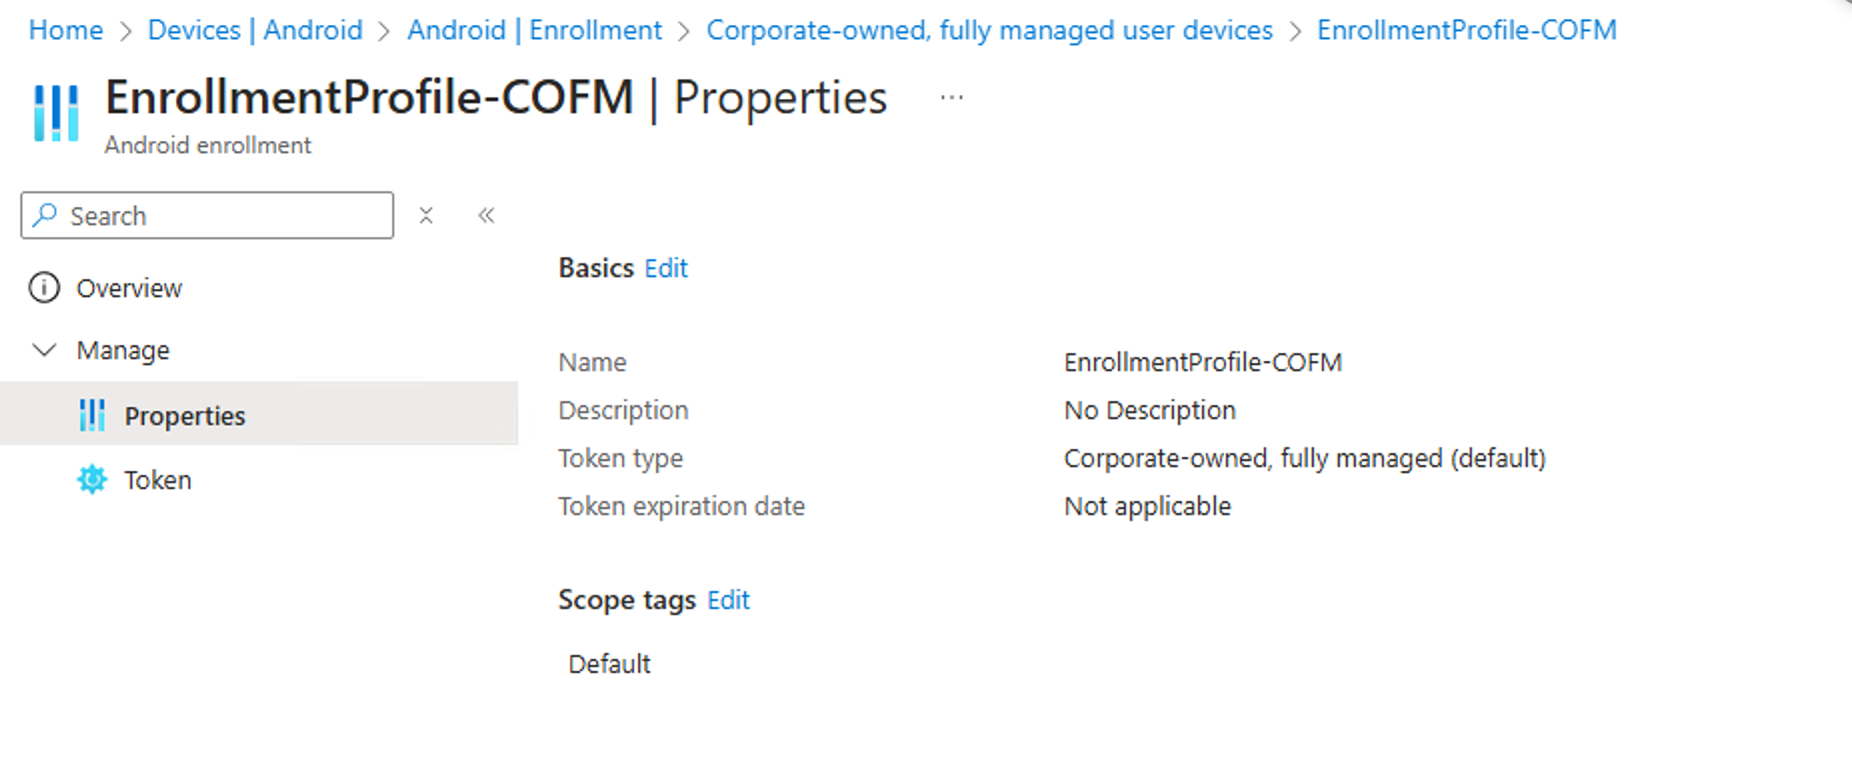
After you created the token which is basically just giving the enrollment profile a name and choosing between the token types:
- Use Fully Managed if users will enroll their own devices during setup.
- Use Fully Managed via Staging if IT needs to pre-configure devices before handing them to employees.
| Feature | Fully Managed | Fully Managed via Staging |
|---|---|---|
| User Assignment | Required during enrollment | Can be assigned later |
| Initial Setup | Done by the end user | IT can set up first |
| Best For | Individual user devices | Bulk provisioning & pre-configured devices |
| Enrollment Type | Direct to user | Staged setup for later user assignment |
After that you are ready to deploy your Android device... yeah in theory... its possible but you should configure the policies first..

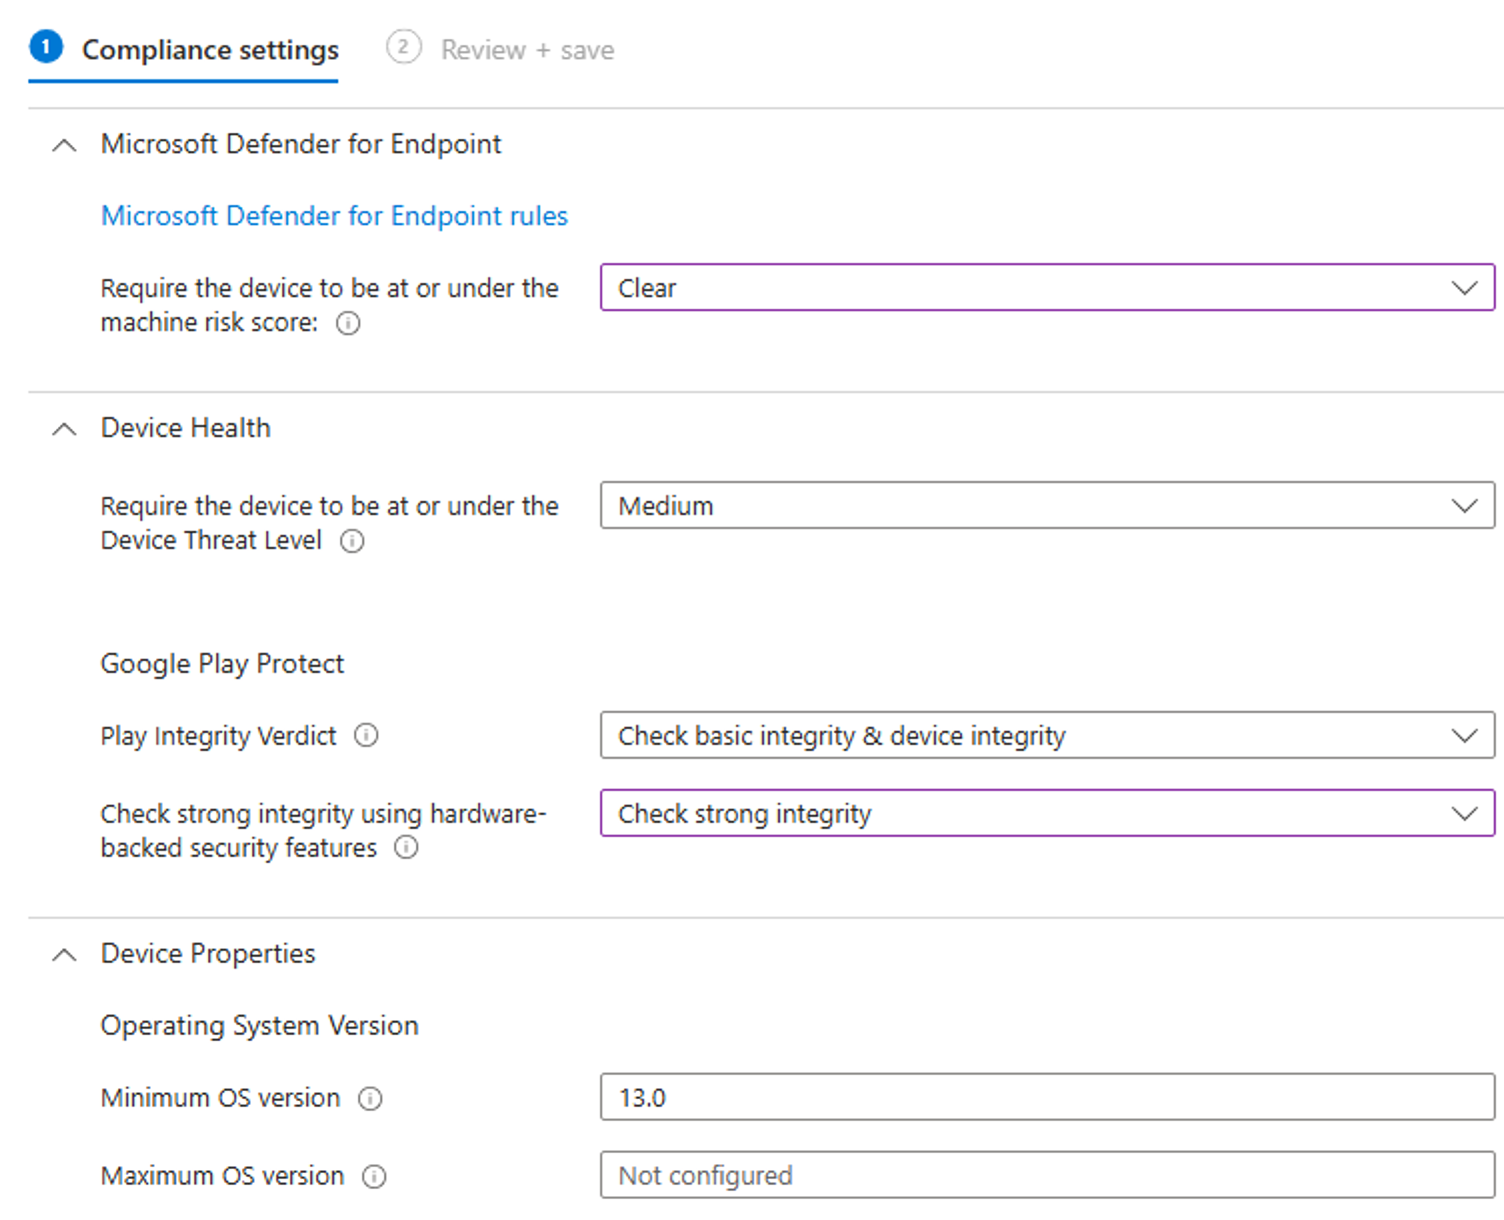
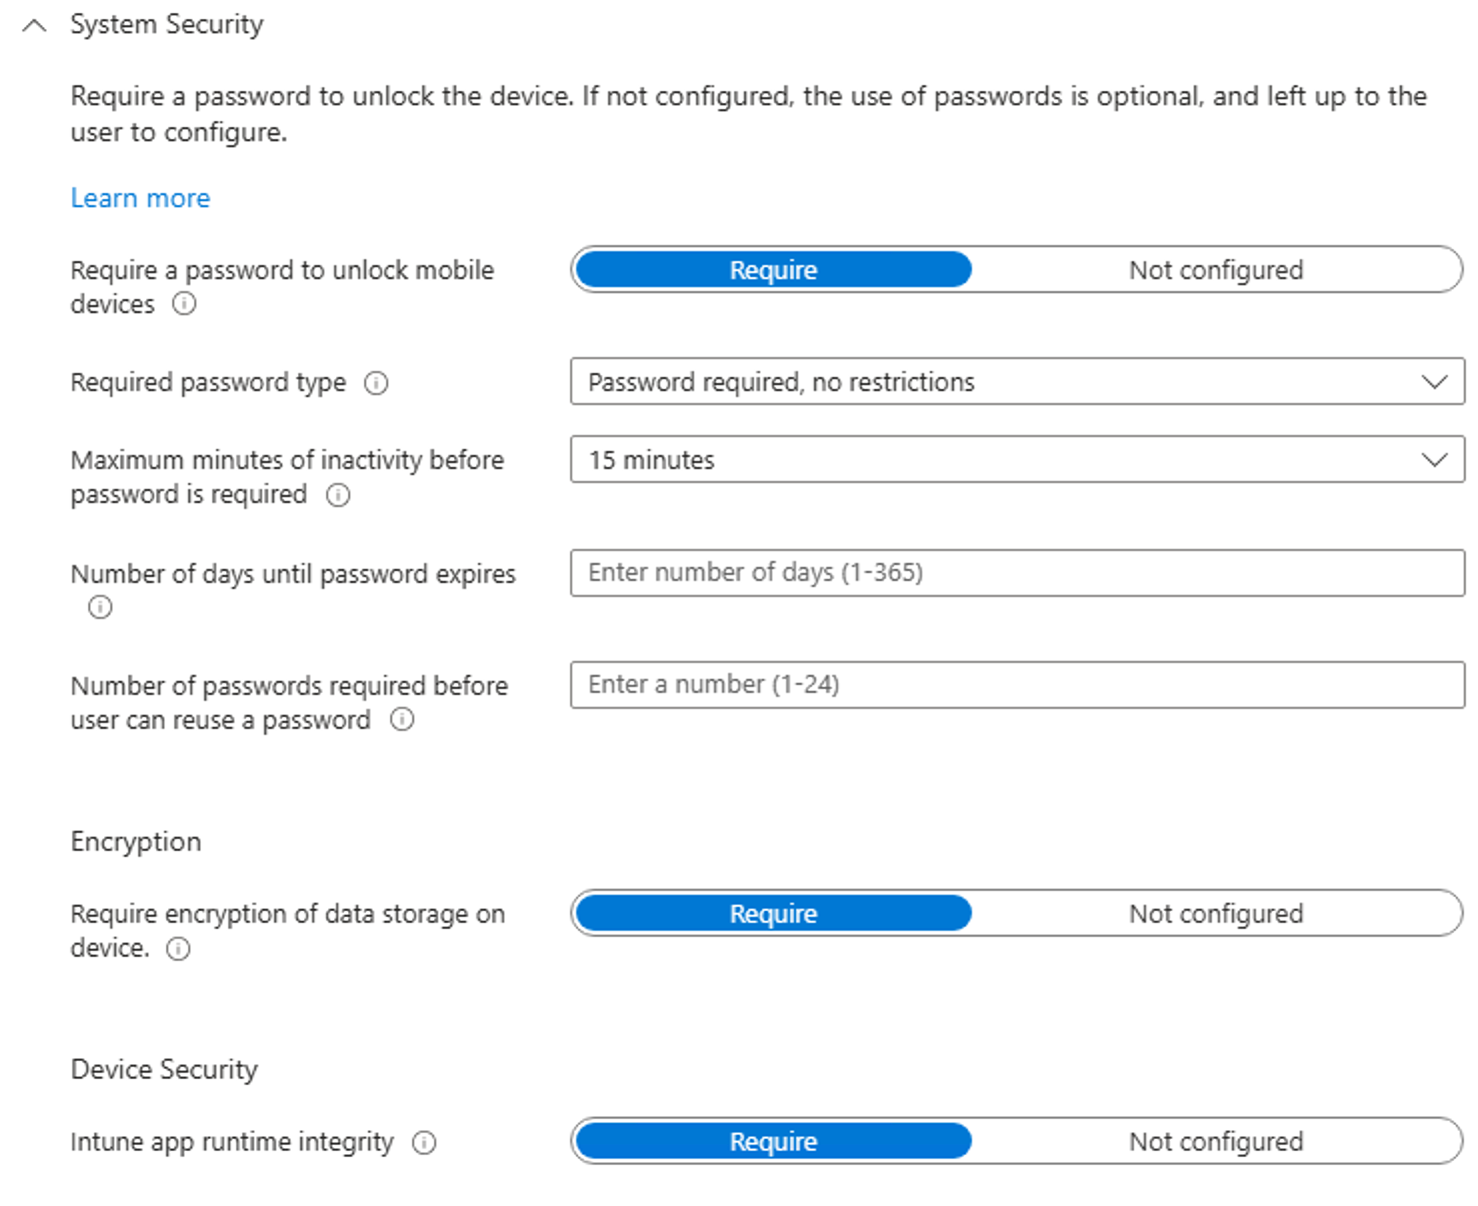
Create a compliance policy
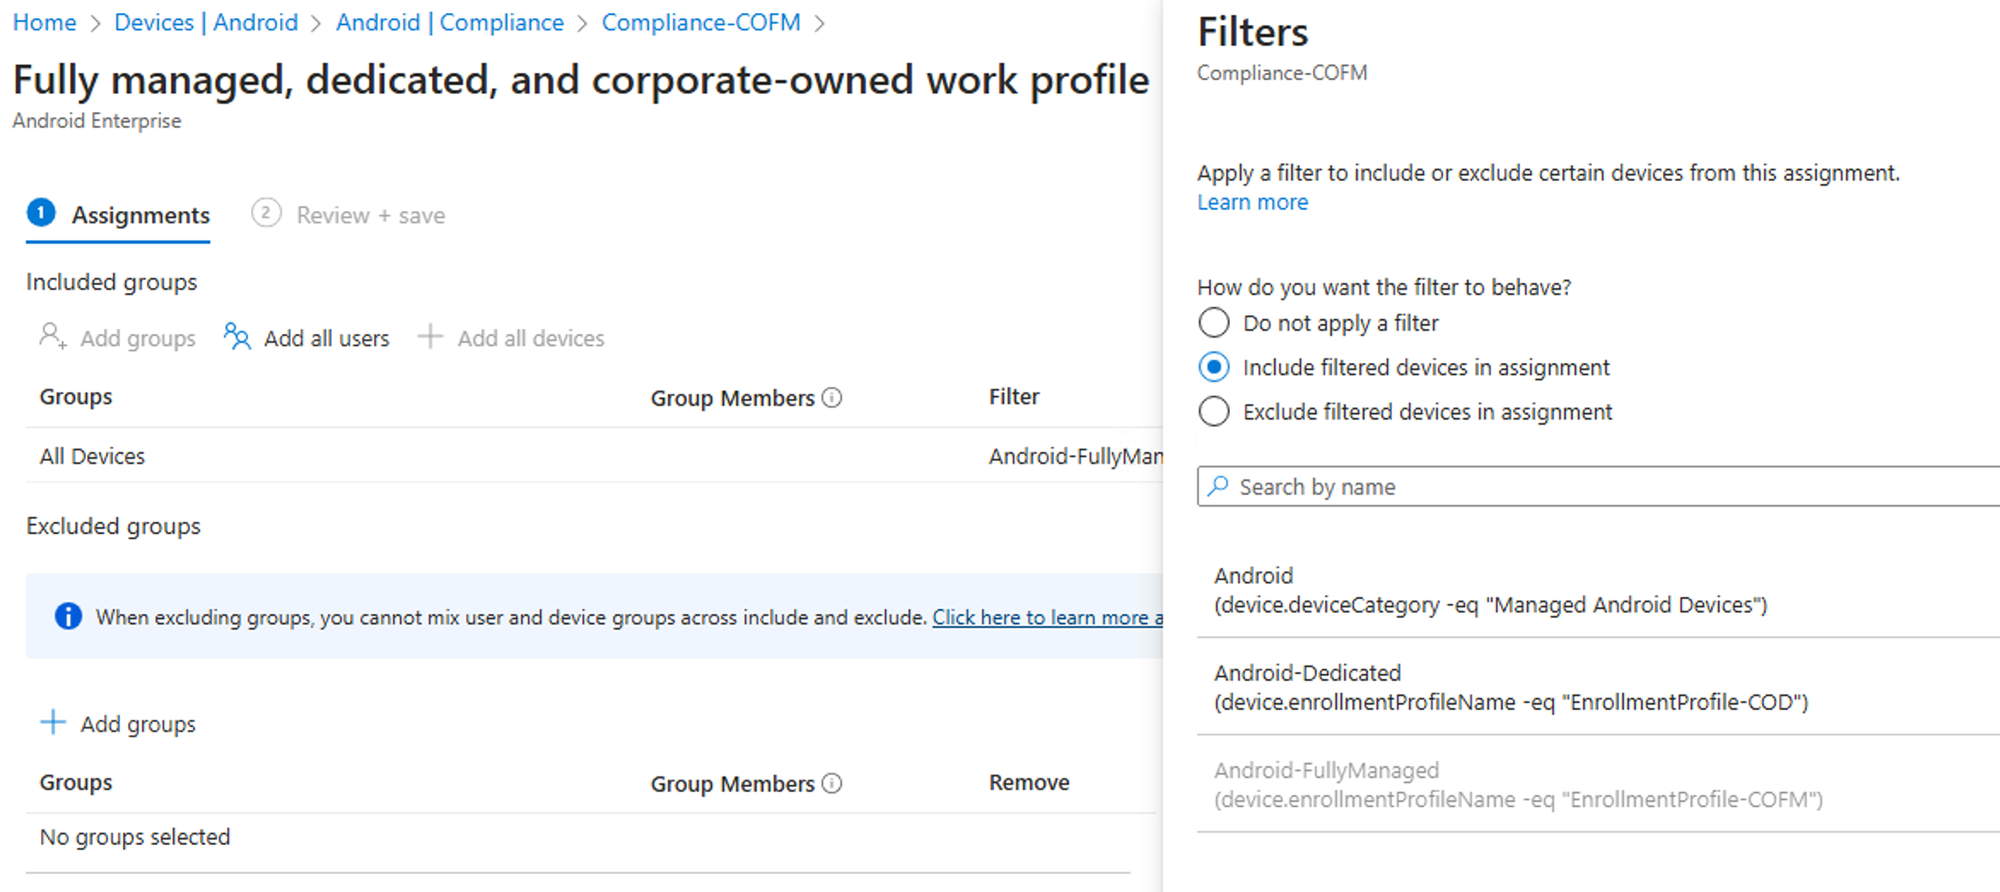
When creating the compliance policy you should set them up in that way to support your configurations and deny access when they do not comply, even if its a slight change. This worked for my test environment:
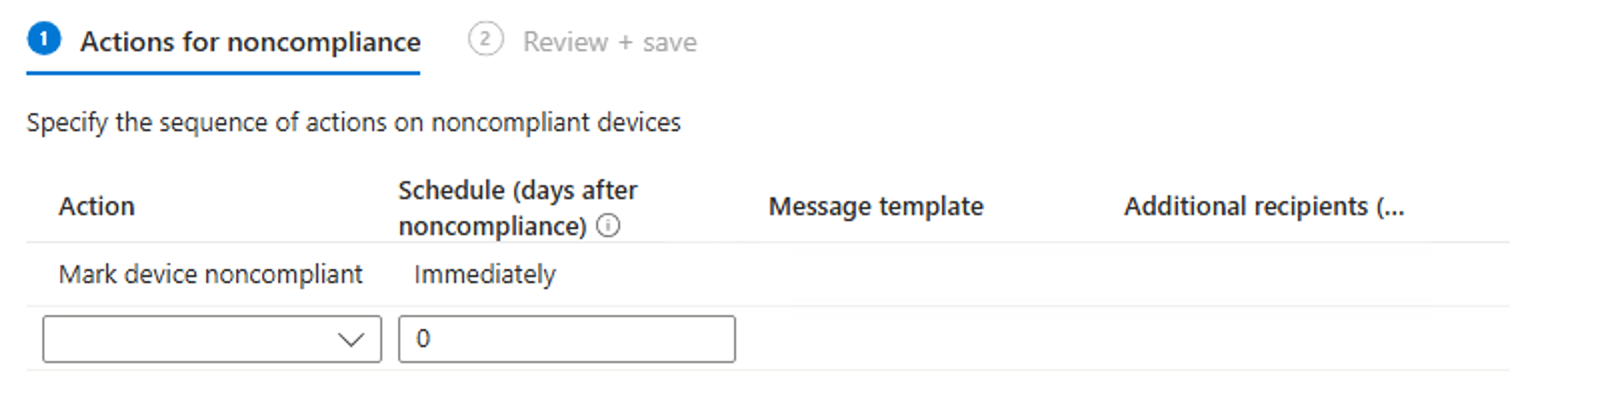
After creating the policy assign it to your desired group or as I recommend work with filters as those are updated faster then group assignments:
Create a restriction configuration policy
Now we can go ahead and create a configuration policy with those settings you would like to assign to your devices:
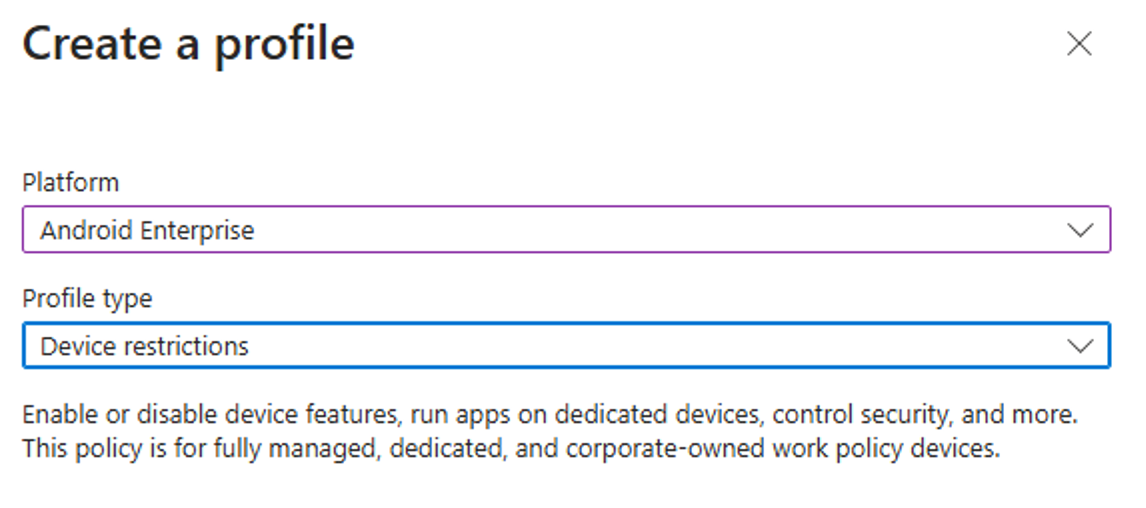
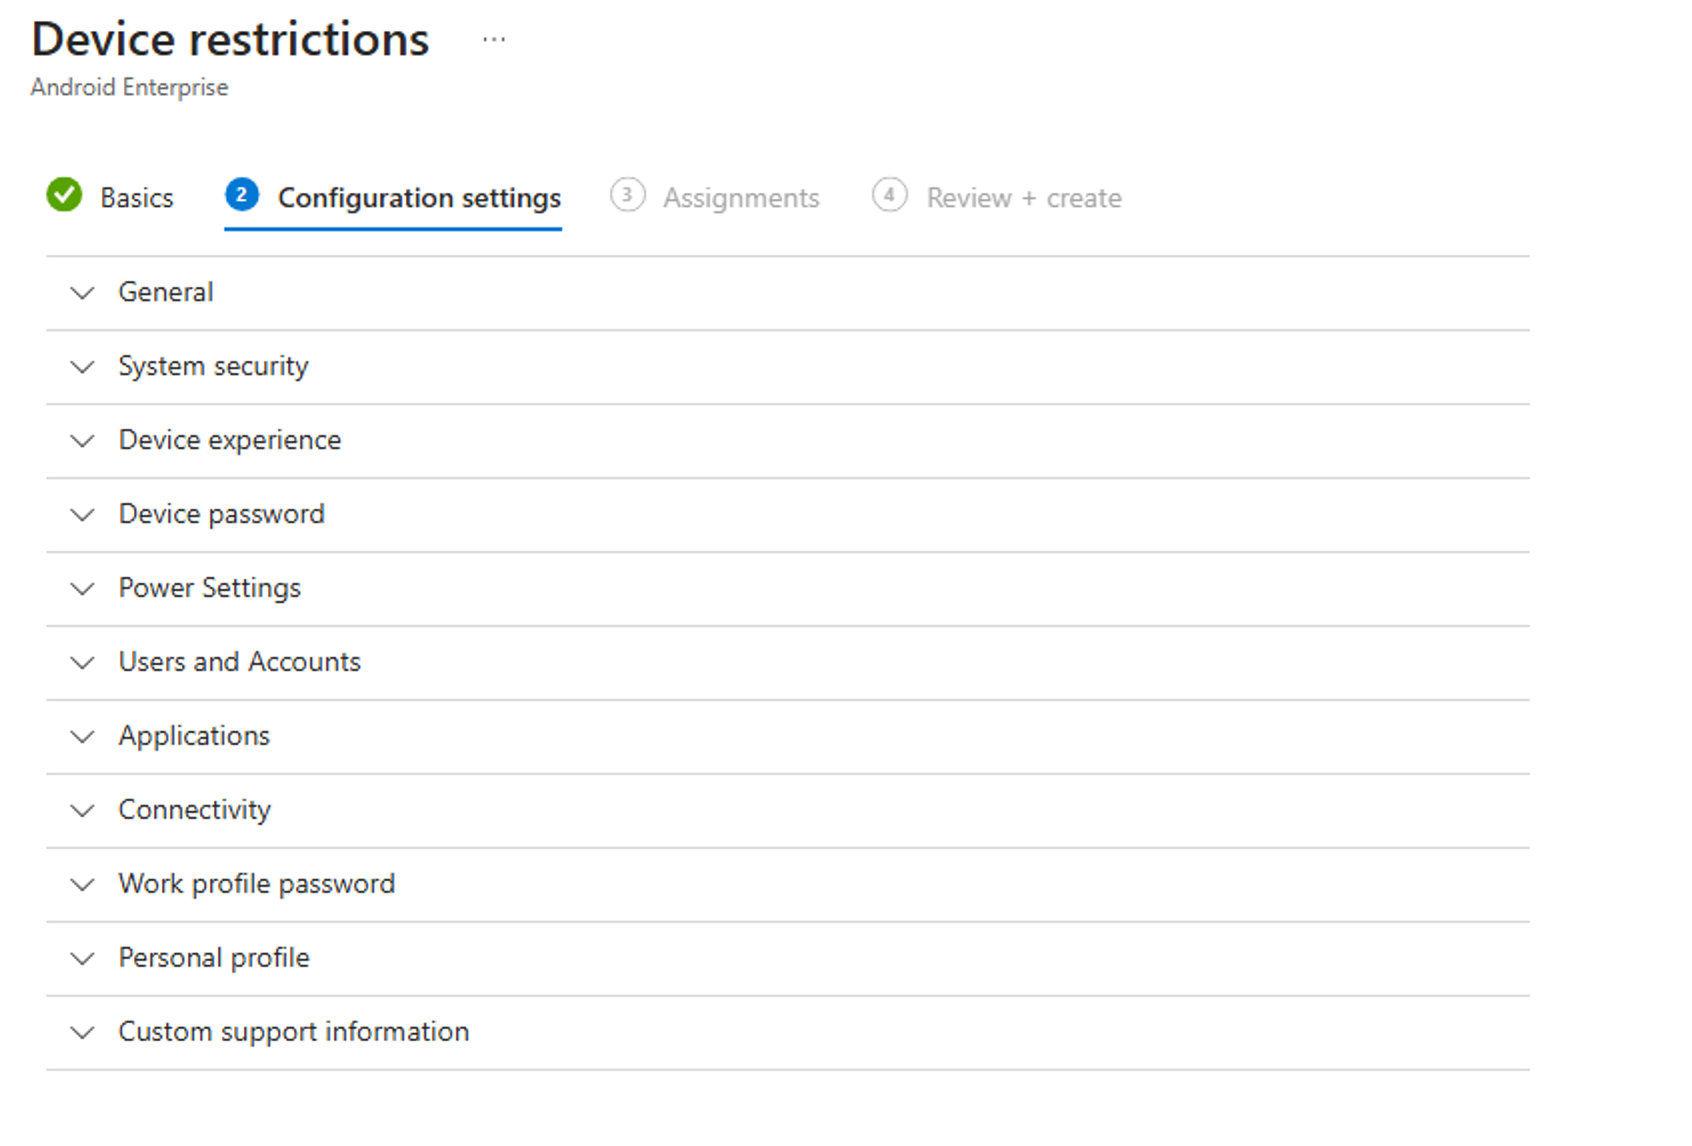
I recommend you to go through the settings carefully and toggle on those settings you would like to deploy. Here are some settings I encourage you to configure:
🔧 System update - Automatic
🔧 Factory reset - Block
🔧 Threat scan on apps - Require
🔧 Add new users - Block
🔧 User can configure credentials (work profile-level) - Block
🔧 User removal - Block
🔧 Personal Google accounts - Block
🔧 Account changes - Block
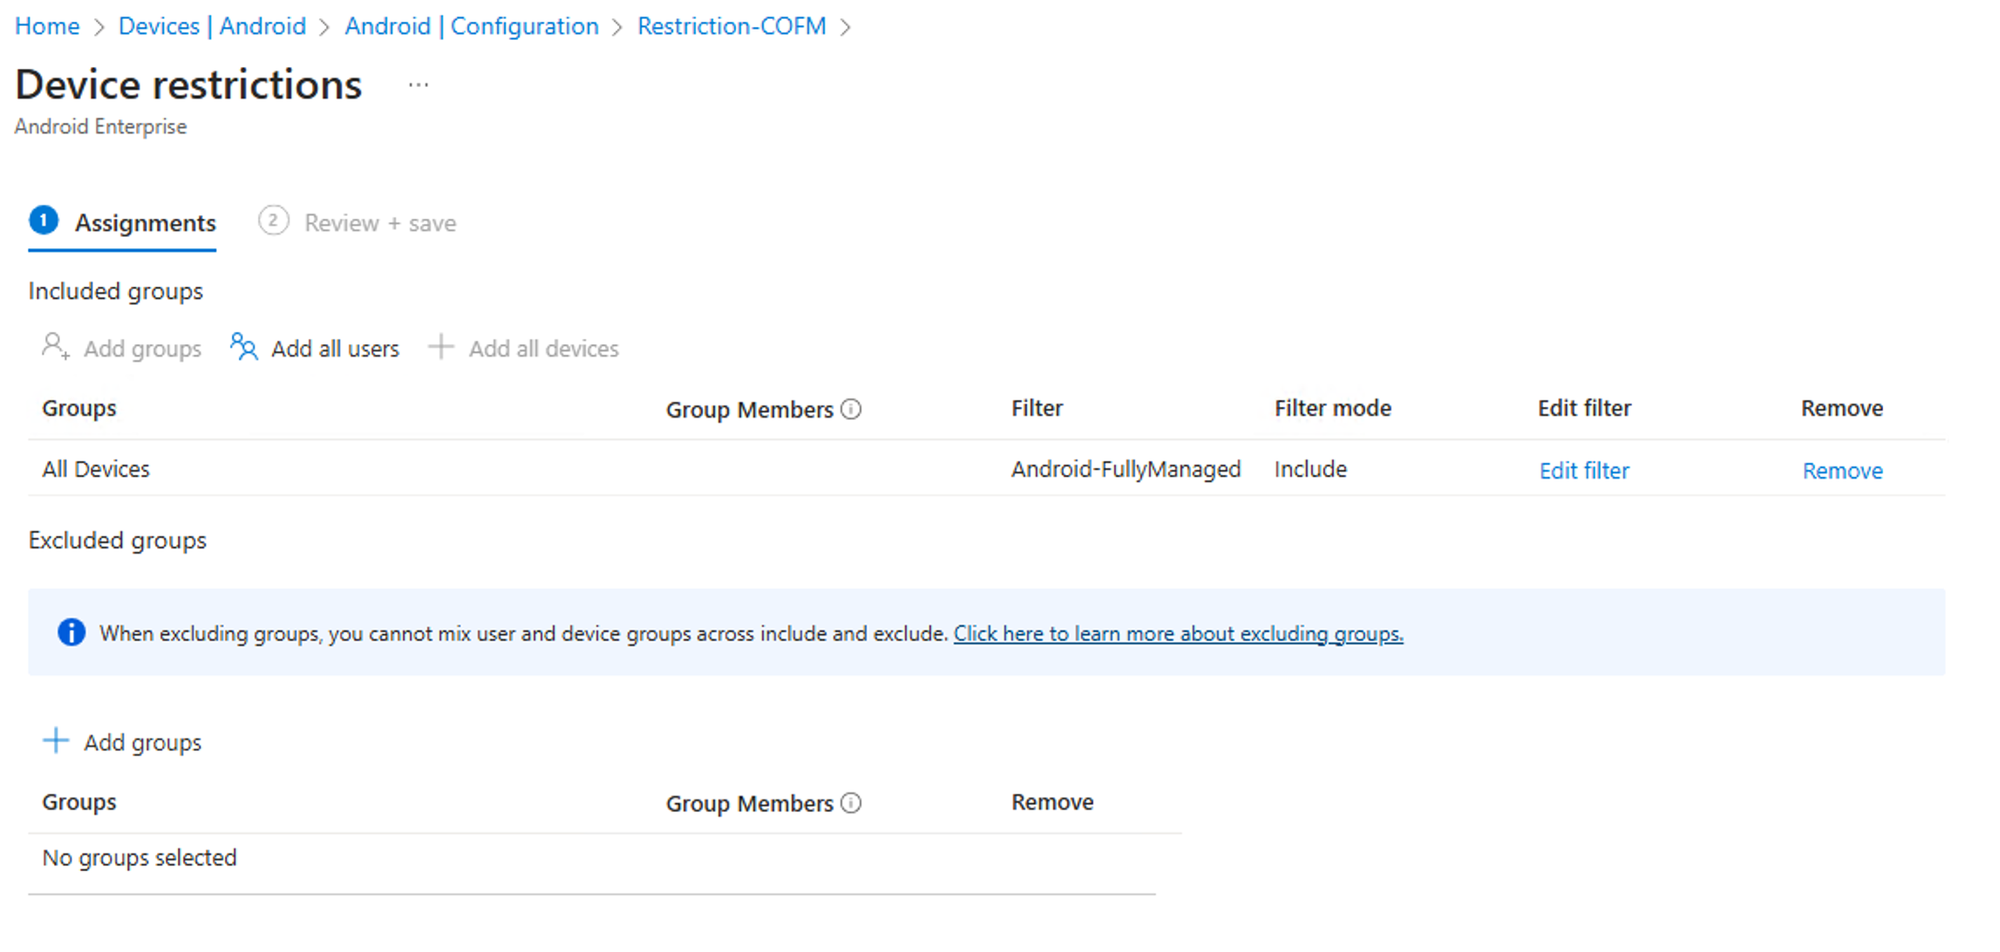
After that assign it to your devices - again I recommend you to work with filters:
Fire up your device
Now you can fire your Android device and follow these steps to enroll your device with the created token:
- On the Welcome screen, select your language.
- Connect to your wireless network, and then choose NEXT.
- Accept the Google Terms and conditions, and then choose NEXT.
- On the Google sign-in screen, enter afw#setup instead of a Gmail account. This value is the DPC identifier for Microsoft Intune. Choose NEXT.
- Choose INSTALL for the Android Device Policy app.
- Continue to install the policy. Some devices may require additional terms acceptance.
- On the Enroll this device screen, allow your device to scan the QR code. Or, enter the token manually.
- Follow the on-screen prompts to complete enrollment.

Now give the device some time to sync and let the magic happen... or your configurations apply :D
🔧 Step 2: Configuring Defender for Endpoint
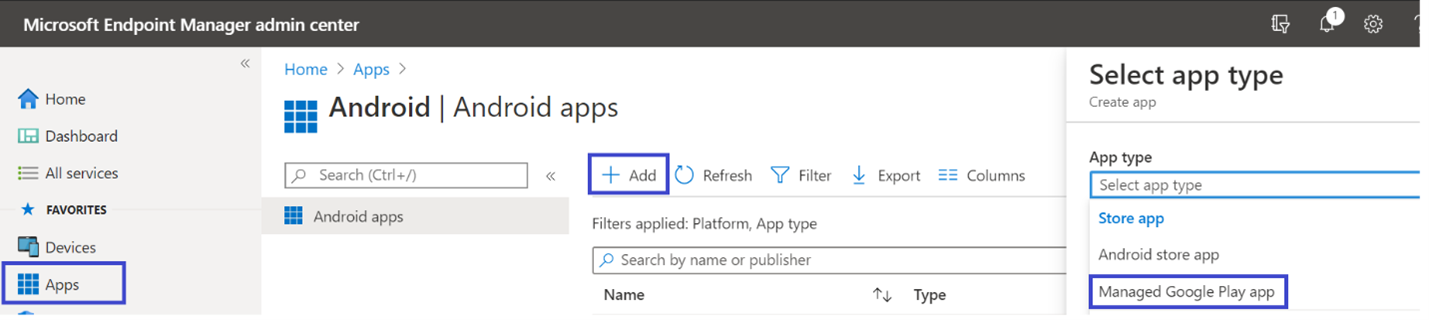
Follow the steps below to add Microsoft Defender for Endpoint app into your managed Google Play Store.
- In Microsoft Intune admin center , go to Apps > Android Apps > Add and select Managed Google Play app.
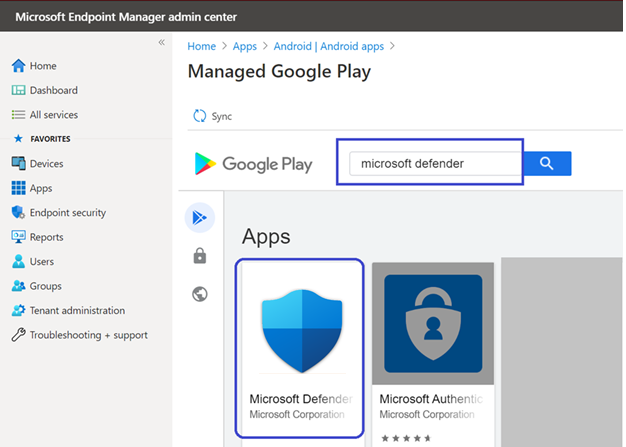
- On your managed Google Play page that loads, go to the search box and type Microsoft Defender. Your search should display the Microsoft Defender for Endpoint app in your Managed Google Play Store. Select the Microsoft Defender for Endpoint app from the list of search results.
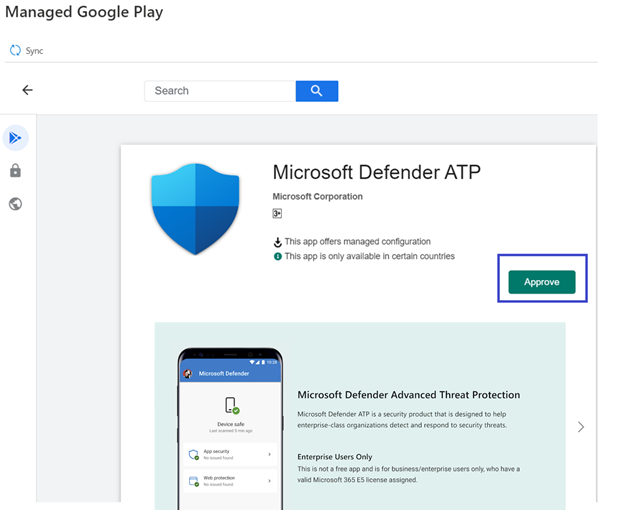
- In the App description page, you should be able to see app details about the Defender for Endpoint app. Review the information on the page, and then select Approve.
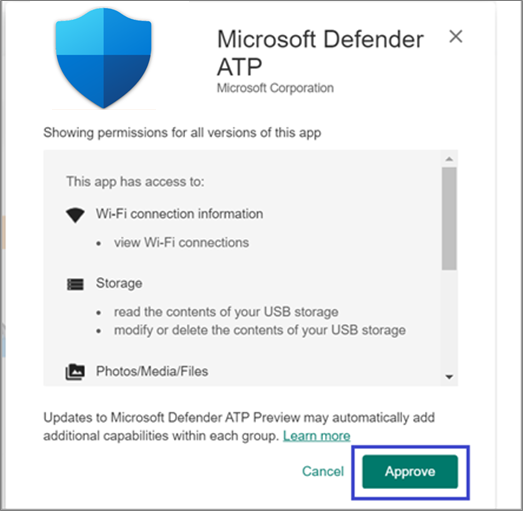
- When you're prompted to approve permissions for Defender for Endpoint obtains, review the information, and then select Approve.
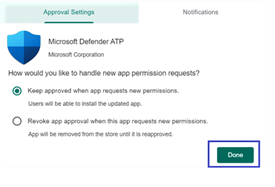
- On the Approval settings page, review your preference to handle new app permissions that Defender for Endpoint on Android might ask. Review the choices, and then select your preferred option. Then, select Done.
By default, managed Google Play selects Keep approved when app requests new permissions.
- After the permissions handling selection is made, select Sync to sync Microsoft Defender for Endpoint to your apps list.
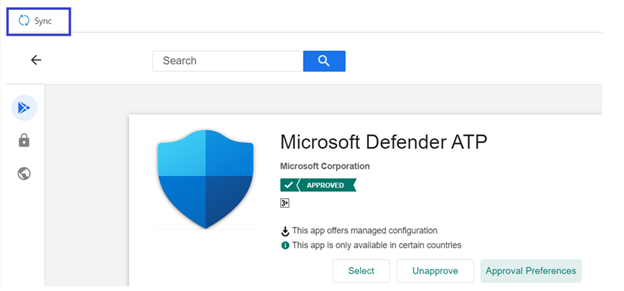
The sync completes in a few minutes.

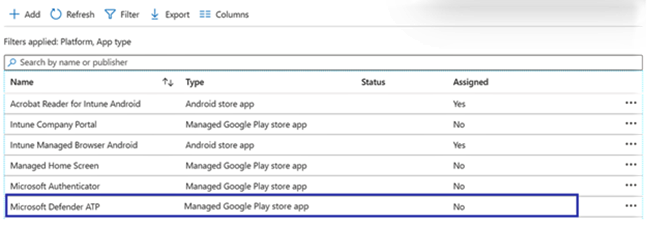
- Select the Refresh button in the Android apps screen. Microsoft Defender for Endpoint should be visible in the apps list.
- Defender for Endpoint supports app configuration policies for managed devices using Microsoft Intune. This capability can be used to select different configurations for Defender for Endpoint.
- In the Apps page, go to Policy > App configuration policies > Add > Managed devices.
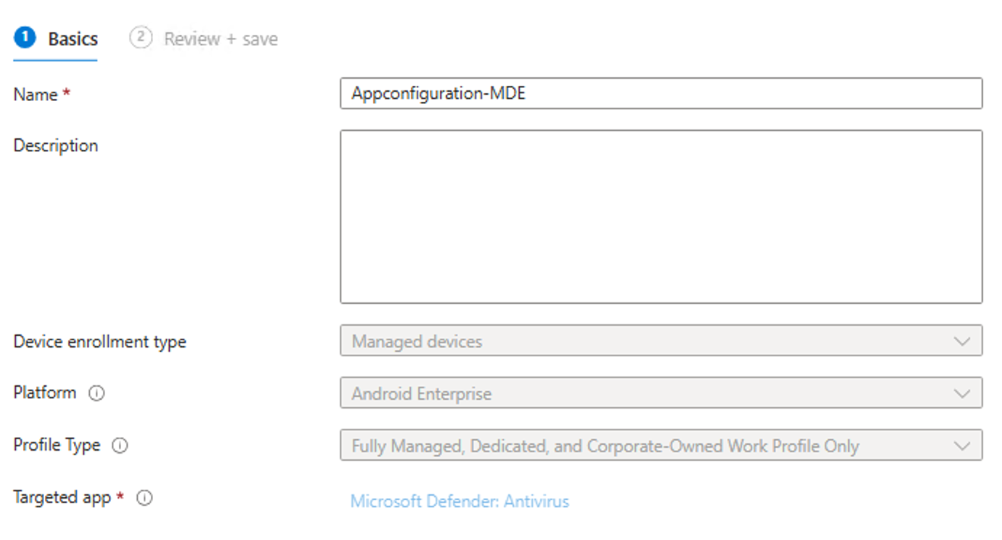
- In the Create app configuration policy page, specify the following details:
- Name: Microsoft Defender for Endpoint.
- Choose Android Enterprise as platform.
- Choose Personally-owned Work Profile only or Fully Managed, Dedicated, and Corporate-owned work profile only as Profile Type.
- Select Select App, choose Microsoft Defender, select OK and then Next.
- Select Permissions > Add. From the list, select the available app permissions > OK.
- Select an option for each permission to grant with this policy:
- Prompt - Prompts the user to accept or deny.
- Auto grant - Automatically approves without notifying the user.
- Auto deny - Automatically denies without notifying the user.
- Go to the Configuration settings section, and choose Use configuration designer.
- Select Add to view a list of supported configurations. Select the required configuration, and then select Ok.
- You should see all the selected configurations listed. You can change the configuration value as required and then select Next.
- In the Assignments page, select the user group to which this app config policy would be assigned. Select Select groups to include, select a group, and then select Next. The group selected here is usually the same group to which you would assign Microsoft Defender for Endpoint Android app.
- In the Review + Create page that comes up next, review all the information, and then select Create.
The app configuration policy for Defender for Endpoint is now assigned to the selected user group.
- Select Microsoft Defender app in the list > Properties > Assignments > Edit.
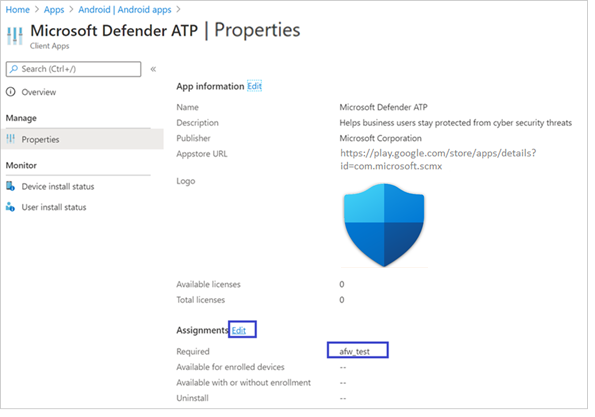
- Assign the app as a required app to a user group. It's automatically installed in the work profile during the next sync of the device via Company Portal app. Navigate to the Required section, select Add group, select the appropriate user group, and then choose Select.
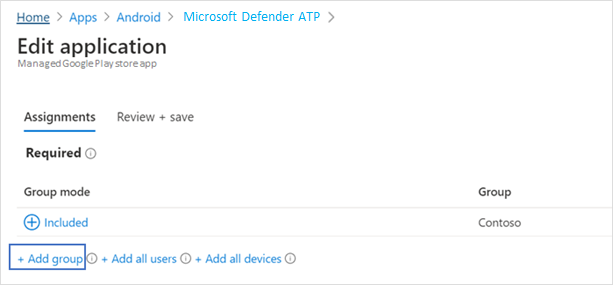
- In the Edit Application page, review all the information that was specified earlier. Select Review + Save, and then select Save to commence assignment.
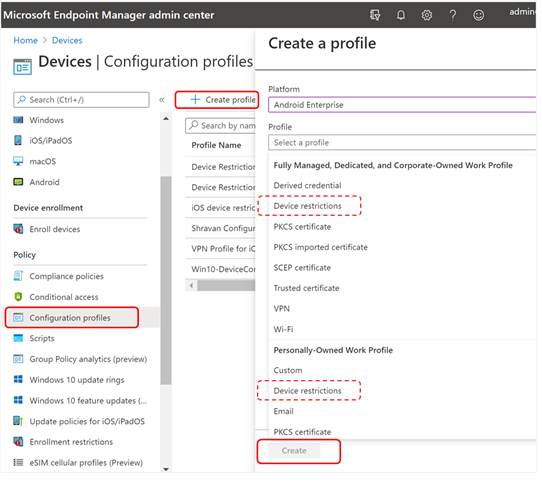
Auto setup of always-on VPN
Defender for Endpoint supports device configuration policies for managed devices with Microsoft Intune. This capability enables you to use auto setup of always-on VPN on Android Enterprise enrolled devices, so the end user doesn't need to set up a VPN service while onboarding.
- On Devices, select Configuration Profiles > Create Profile > Platform > Android Enterprise. Select Device restrictions under one of the following, based on your device enrollment type:
- Fully Managed, Dedicated, and Corporate-Owned Work Profile
- Personally owned Work Profile
Then, select Create.
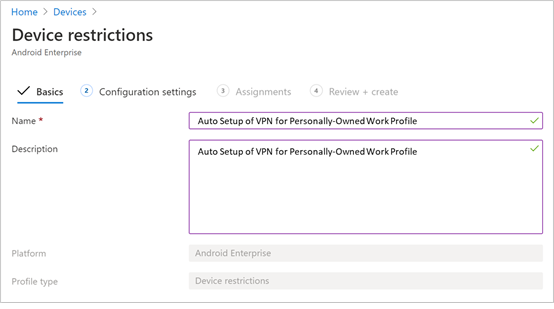
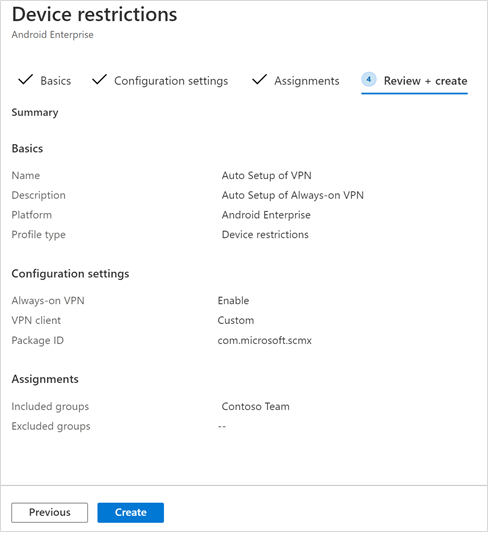
- Configuration Settings. Provide a Name and a Description to uniquely identify the configuration profile.
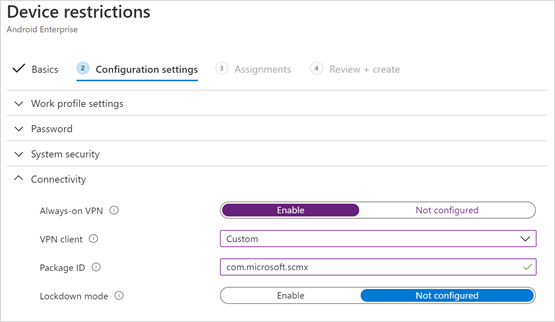
- Select Connectivity, and then configure your VPN.
- Enable Always-on VPN. Set up a VPN client in the work profile to automatically connect and reconnect to the VPN whenever possible. Only one VPN client can be configured for always-on VPN on a given device, so be sure to have no more than one always-on VPN policy deployed to a single device.
- In the VPN client list, select Custom. In this case, the custom VPN is the Defender for Endpoint VPN, which provides Web Protection.
- Specify the Package ID of the Microsoft Defender for Endpoint app in Google Play store. For the Microsoft Defender app URL, the package ID is com.microsoft.scmx.
- Set Lockdown mode to Not configured (Default).
- Assignment. On the Assignments page, select the user group to which this app config policy would be assigned. Choose Select groups to include, select the applicable group, and then select Next.
The group to select is typically the same group to which you would assign Microsoft Defender for Endpoint Android app.
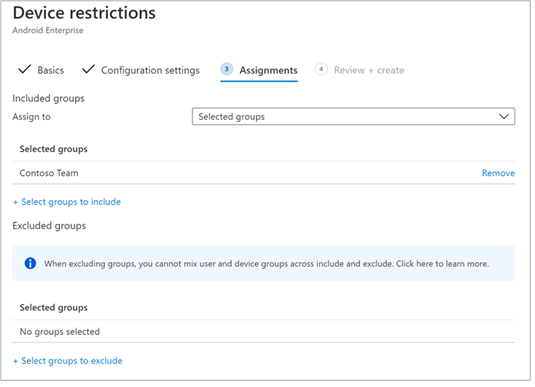
- In the Review + Create page that comes up next, review all the information and then select Create. The device configuration profile is now assigned to the selected user group.
Check status and complete onboarding
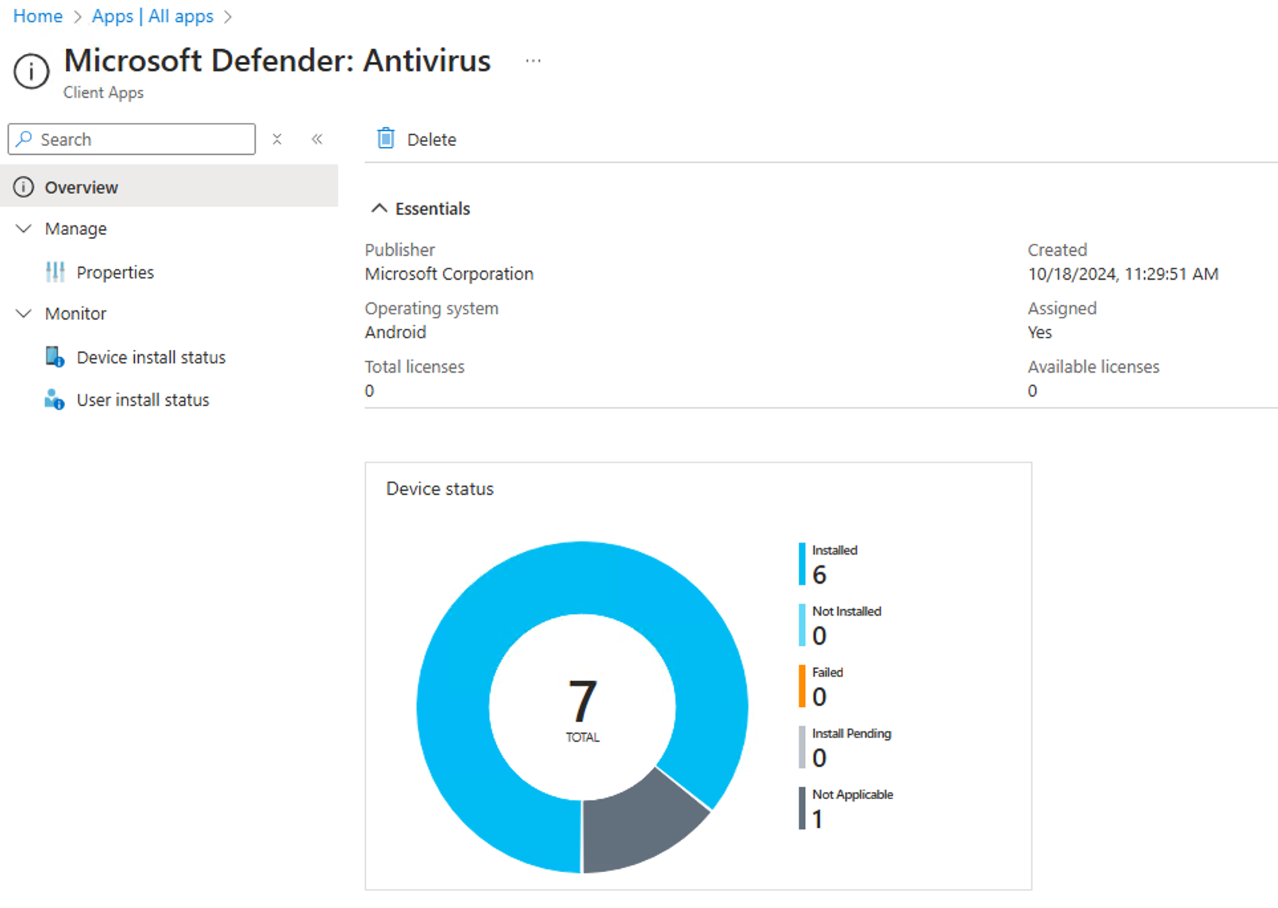
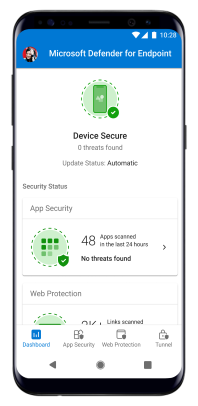
- Confirm the installation status of Microsoft Defender for Endpoint on Android by tapping Device Install Status or directly into the enrolled application and verify that the device is displayed here.
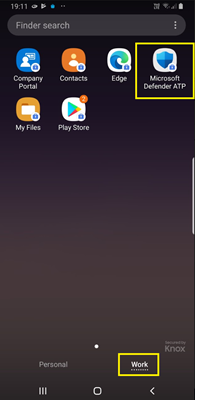
- On the device, you can validate the onboarding status by going to the work profile. Confirm that Defender for Endpoint is available, and that you're enrolled using the Personally owned devices with work profile. If you're enrolled using a Corporate-owned, fully managed user device, you have a single profile on the device where you can confirm that Defender for Endpoint is available.
- When the app is installed, open the app, and then accept the permissions. Onboarding should successfully complete.
Optional, but do the extra miles - Configure low-touch onboarding
As described, you have to accept a set of permissions, so the defender can work properly on the Android device. Now with low-touch onboarding in GA, you can create a smoother configuration experience for the user, when accepting those permissions
low-touch onboarding
"Administrators can configure Microsoft Defender for Endpoint in low-touch onboarding mode. In this scenario, administrators creates a deployment profile, and the user is required to provide a reduced set of permissions to complete onboarding. Android low-touch onboarding is disabled by default."
- Push the Microsoft Defender app to target user groups by following the steps in the section, Add Microsoft Defender for Endpoint on Android as a Managed Google Play app
- (If you followed this blog, thats done already ✅).
- Push a VPN profile to the user's device by following the instructions in the section, Auto Setup of Always-on VPN
- (If you followed this blog, thats done already ✅).
- In Apps > Application configuration policies, select Managed Devices.
- Provide a name to uniquely identify the policy.Then select Next.
- For Platform, select
Android Enterprise. - Select the required profile type.
- For the targeted app, select
Microsoft Defender: Antivirus.
- For Platform, select
- Add runtime permissions. Select Location access (fine), POST_NOTIFICATIONS and change the Permission state to
Auto grant. (This permission isn't supported for Android 13 and later.) - Under Configuration settings, select
Use Configuration designer, and then select Add. - Select Low touch onboarding and User UPN. For User UPN, change the value type to
Variable, and set the configuration value toUser Principal Name. Enable low-touch onboarding by changing its configuration value to1.After the policy is created, these value types show up as string values. - Assign the policy to the target user group.
- Review and create the policy.
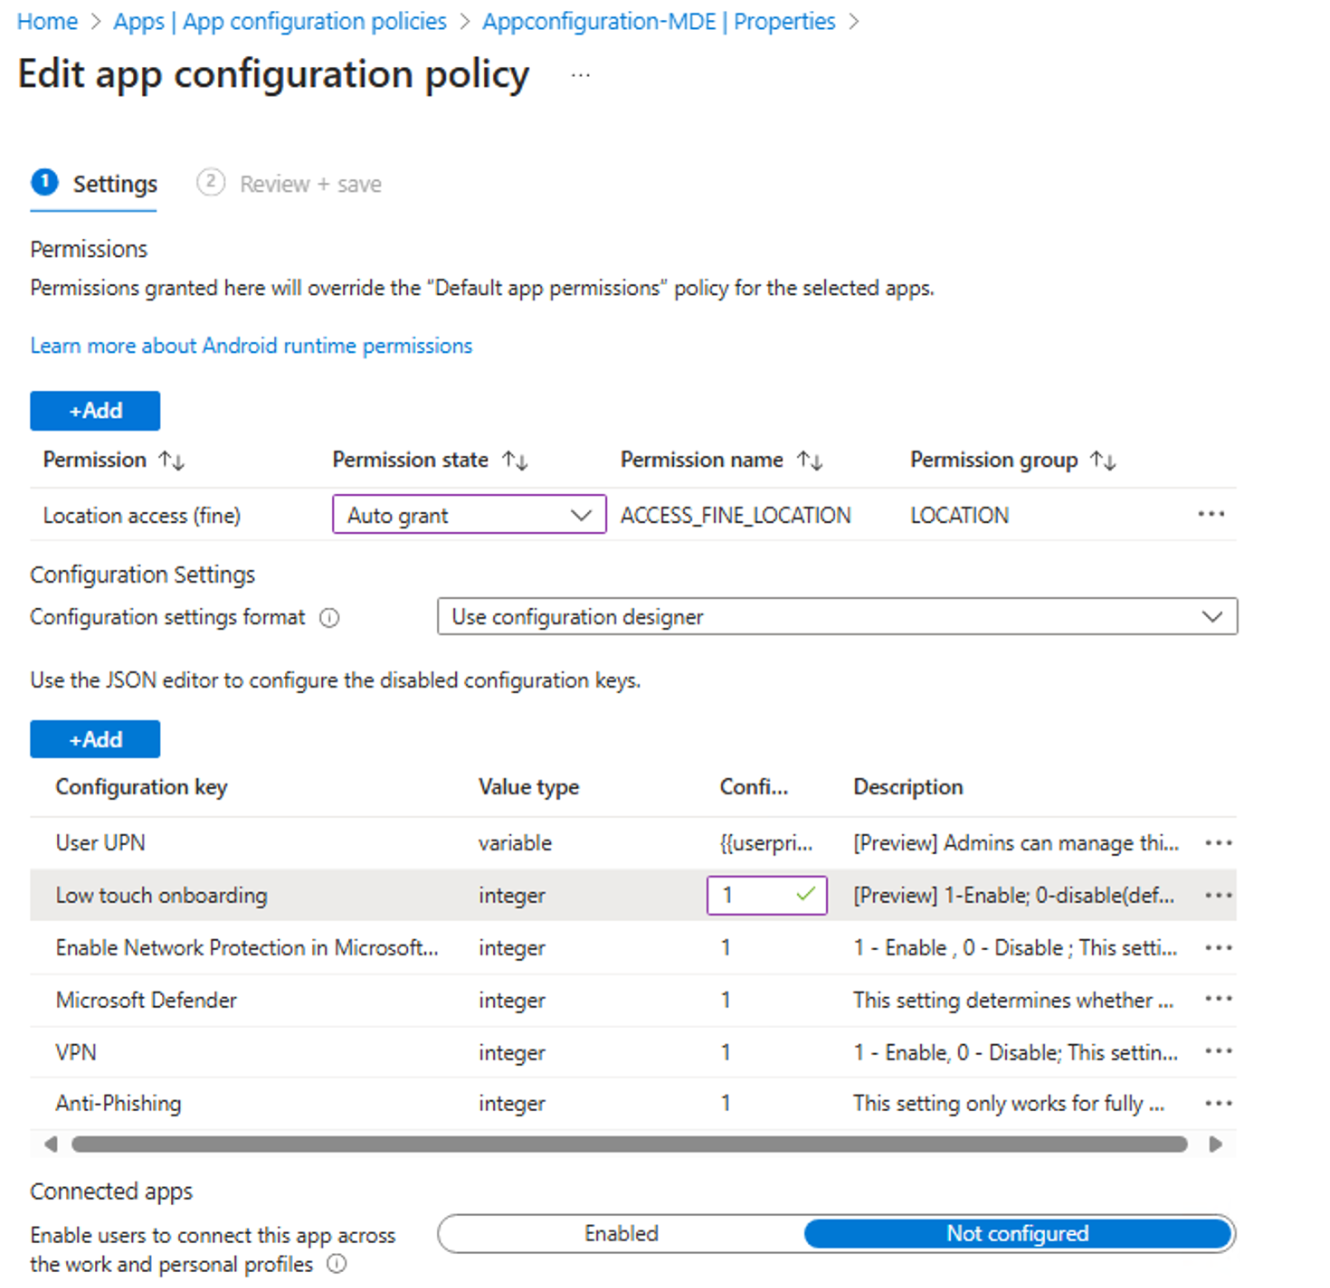
- Enable Network Proection, 1
- Microsoft Defender, 1
- VPN, 1
- Anti-Phishing, 1
🔎 Validation and Testing
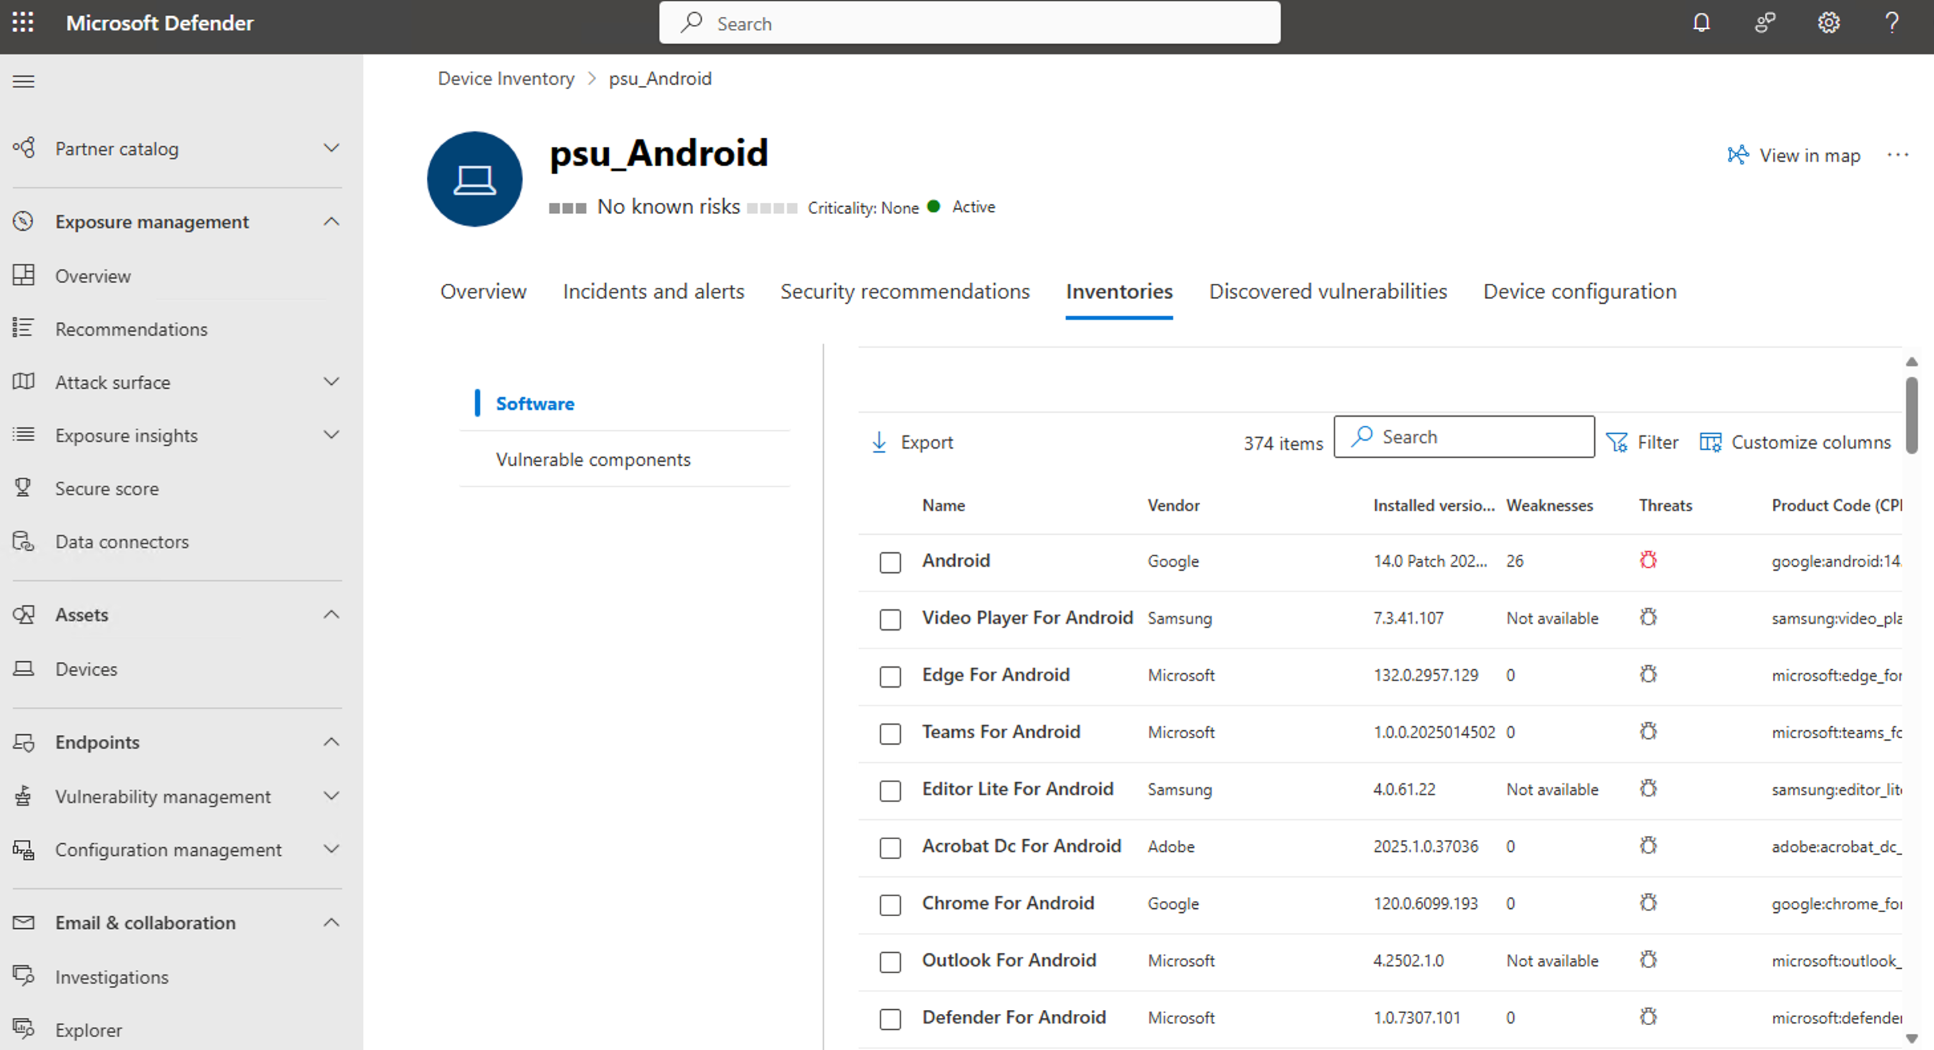
Once you've done all the steps you should be able to verify the onboarding status in the Microsoft Defender portal. Navigate to Device inventory page and search for your device:
📝 Summary
Let’s recap what we covered in this post:
- Initial enrollment configuration
- Initial compliance policy configuration
- Initial configuration policy configuration
- Enrollment of the device
- Enrollment and configuration of the Defender application
This complete guide provides security teams with a step-by-step approach to securing Android endpoints using Microsoft Intune and Defender for Endpoint. By following this blog, organizations can:
✅ Ensure seamless device enrollment and management through Intune
✅ Deploy Defender for Endpoint for mobile threat defense
✅ Enforce configuration and compliance policies
✅ Protect frontline and industrial workers' devices against modern cyber threats
By implementing this solution, organizations can strengthen their mobile security posture while maintaining a user-friendly and scalable approach. 🚀
⚠️ Disclaimer
The configurations shared in this post reflect my personal approach to solving this specific challenge. Every environment is unique, so adapt these solutions to fit your needs.
Happy configuring! 😊


